(320) 639-2229 | medical@babysonbroadway.com

Search

Product Support

Dexcom

Dexcom General FAQs

You should order Dexcom G6. As soon as your connected pump integrates with Dexcom G7, you will be able to switch to Dexcom G7.

If you have irritated or sensitive skin please work with your healthcare professional (HCP).
 
This is a summary of two clinical articles published by clinicians independent from Dexcom based on their knowledge and experience.*† Dexcom has not tested these approaches nor do we endorse these specific approaches. For detailed step-by-step instructions on how to use the Dexcom G6 Continuous Glucose Monitoring (CGM) System, please refer to the user guide.
 
Do you have irritation at the sensor site or sensitive skin? These considerations, skin barriers, and professional tips may help. Remember what works best for one person may not work best for everyone. You may need to try several different products or methods for you and your HCP to figure out what works best.
 
General consideration*
  • Clean skin with oil-free, antimicrobial soap and dry thoroughly1,2
  • Gentle exfoliation recommended for oily skin2
  • Trim hair with dry razor if needed3
  • Do not use any lotion or oil containing moisturizer where you insert the sensor
  • Do not insert sensor immediately after a shower/bath or in a steamy bathroom—minimize humidity with hairdryer or application in a dry environment2
  • Solid or spray antiperspirant (unscented) may help with skin prone to sweating. Create an empty oval on the skin with the antiperspirant, wait 10–15 min. Insert sensor on clean skin in center of oval.1,2
 
Barrier Films*
  • Barrier films may help prevent mild skin irritation from adhesives4
  • Create an empty oval on the skin with the barrier film and insert sensor on clean skin in center of oval
  • Let barrier film dry completely before placing sensor1,4
  • May apply 1 layer or a second after first layer has drieda
 
 
Product
Advantages
Professional Tips
Smith and Nephew IV Prep
– Waterproof, breathable barrier film
– Also contains alcohol for antiseptic properties
– Comes in wipes
– Let dry completely on skin
– Not marketed as having tackifying properties, but may see mild enhancement to adhesiona
Bard® Protective Barrier Film
– Waterproof, breathable barrier film
– Comes in wipes or spray
– Does not include antiseptic
SurePrep™ (Medline)
– Vapor permeable barrier film
– Includes antiseptic
– Comes in wipes
– Can be used on damaged skin as protection
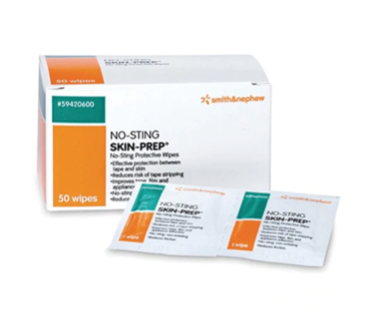
Smith and Nephew Skin prep/no-sting skin prep
– Waterproof, breathable barrier film
– Popular choice due to moderate protection and moderate adhesive properties combineda
– Comes in wipes or spray
– Skin prep indicated for intact skin, no-sting skin prep indicated for intact or damaged skin
– Does not include antiseptic
Cavilon™ No Sting Barrier (3M™)
– Waterproof, breathable barrier film
– Comes in wipes or spray
– Does not include antiseptic
AllKare® Protective Barrier Wipe
– Waterproof, breathable barrier film
– Comes in wipes
– Does not include antiseptic
 
Barrier Patches and Bandages*
  • Use barrier patches and bandages only if barrier film did not work for you
  • Dexcom has not tested the use of barrier patches and bandages. Talk to your HCP about the use of barrier patches and bandages.
  • When used as a barrier, patches/bandages must be placed underneath the sensor adhesive patch2,5,6
  • Place on skin before sensor adhesive
  • Cut an empty oval in the patch/bandage and insert sensor on clean skin in center of oval
 
 
Product
Advantage
Professional Tips
Hydrocolloid dressings:
– DuoDERM®
– Toughpads
– (Dynarex) Dynaderm™
– BAND-AID® Brand HYDRO SEAL®
– Hydrocolloid provides thick protection
– Waterproof
– Some brands have ‘‘extra thin’’ version
– Some latex free
 
– Offers stronger barrier protection than an adhesive patch, such as IV 3000 or Tegaderm
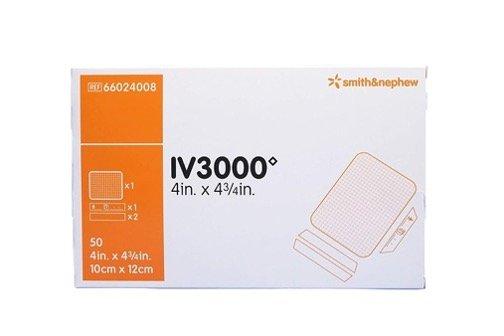
IV3000 (Smith&Nephew)
– Transparent, thin film, precut patch
– May be less irritating than sensor adhesives
– May also be used as an adhesive enhancer when placed over sensor tape
– More prone to peel with water, sweating, humiditya
– Many patients report less skin reaction with IV3000 compared with Tegaderma
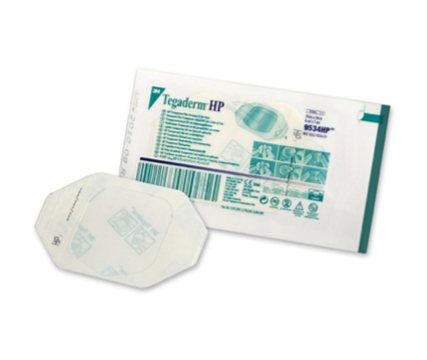
Tegaderm or Tegaderm HP
– Transparent, thin film, precut patch
– HP stands for ‘‘Holding Power’’ and may adhere more strongly than standard Tegaderm
– May also be used as an adhesive enhancer when placed over sensor tape
– More prone to peel with water, sweating, humiditya
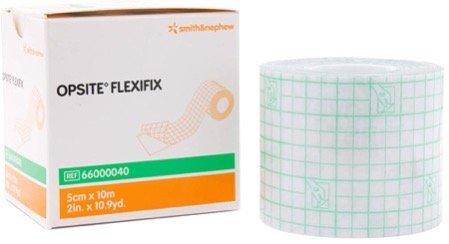
Opsite/Flexifit (Smith&Nephew)
– Roll of thin transparent film can be cut to size
– May also be used as an adhesive enhancer when placed over sensor tape
COMPEED® Plasters
– Absorbs moisture on skin, possibly aiding adhesion
– Original intention as blister cushion
– Adheres better after warming to skin temperature in hands before applicationa
 
Over the Counter Steroid Spray
Product
Advantages
Professional Tips
Fluticasone propionate nasal spray (generic). Common examples:
– Flonase® Allergy Relief
– Flonase® Children’s Allergy Relief
– Clarispray® Nasal Allergy Spray
– May prevent mild, moderate, and severe skin reactions due to CGM adhesive
– Apply 2 puffs to sensor site. Wait 2 minutes for spray to dry. Insert sensor as usual.
 
 
*Messer, L. , & Beatson, C., Preserving Skin Integrity with Chronic Device Use in Diabetes. Technology & Therapeutics Volume 20, Supplement 2, 2018.
† Paret, M., Barash, G. & Rachmiel, M. “Out of the box” solution for skin problems due to glucose-monitoring technology in youth with type 1 diabetes: real-life experience with fluticasone spray. Acta Diabetol 57, 419–424 (2020).
1. Ives B, Sikes K, Urban A, et al.: Practical aspects of realtime continuous glucose monitors: the experience of the Yale Children’s Diabetes Program. Diabetes Educ 2010;36: 53–62.
2. Chase HP, Messer L: Understanding Insulin Pumps and Continuous Glucose Monitors. 3rd ed. Denver: Children’s Diabetes Research Foundation, 2016.
3. Karlin AW, Ly TT, Pyle L, et al.: Duration of infusion set survival in lipohypertrophy versus nonlipohypertrophied tissue in patients with type 1 diabetes. Diabetes Technol Ther 2016;18:429–435.
4. McNichol L, Lund C, Rosen T, Gray M: Medical adhesives and patient safety: State of the science: consensus statements for the assessment, prevention, and treatment of adhesiverelated skin injuries. J Wound Ostomy Continence Nurs 2013;40:365–380; quiz E361–E362.
5. Englert K, Ruedy K, Coffey J, et al.: Skin and adhesive issues with continuous glucose monitors: a sticky situation. J Diabetes Sci Technol 2014;8:745–751.
6. Ives B, Sikes K, Urban A, et al.: Practical aspects of realtime continuous glucose monitors: the experience of the Yale Children’s Diabetes Program. Diabetes Educ 2010;36: 53–62. a Used within institution or support in public commentary, online articles, diabetes blogs, social media.
 
Failure to use the Dexcom G6 Continuous Glucose Monitoring System (G6) and its components according to the instructions for use provided with your device and available at https://www.dexcom.com/safety-information and to properly consider all indications, contraindications, warnings, precautions, and cautions in those instructions for use may result in you missing a severe hypoglycemia (low blood glucose) or hyperglycemia (high blood glucose) occurrence and/or making a treatment decision that may result in injury. If your glucose alerts and readings from the G6 do not match symptoms or expectations or you’re taking over the recommended maximum dosage amount of 1000mg of acetaminophen every 6 hours, use a blood glucose meter to make diabetes treatment decisions. Seek medical advice and attention when appropriate, including for any medical emergency.
This is a summary of a clinical article published by clinicians independent from Dexcom, based on their knowledge and experience.* Dexcom has not tested these approaches, nor do we endorse these specific approaches. For detailed step-by-step instructions on how to use the Dexcom G6 Continuous Glucose Monitoring (CGM) System, please refer to the user guide.
 
Do you find it painful removing the sensor adhesive? Is there a sticky residue left behind on your skin? These techniques and products may help. Remember that what works best for one person may not work best for everyone. You may need to try several different products or methods to figure out what works best for you.
 
General Removal Techniques
 
Loosen edge of adhesive with fingernail and use products listed below, if necessary.1,2
 
While removing tapes, use fingers of opposite hand to push skin down and away from adhesive. Continue to move fingers on skin toward adhesive as it is removed.2
 
‘‘Fold back’’ technique: Remove adhesive slowly, at low angle, folding back on itself.2
 
‘‘Stretch and relax’’ technique: Films that stretch (e.g., IV3000 or Tegaderm) may be stretched horizontally away from the center (opposite of the fold back technique) while walking fingers under the dressing to continue stretching it.2
 
Use adhesive removal wipes to rub the skin under the tape toward the adhesive as it is removed. This helps loosen adhesive from skin and may help reduce pain with removal.1
 
Removal Products and Descriptions
Product
Description
Uni-solve Adhesive Remover (Smith&Nephew)
– Comes in wipes or liquid
AllKare Adhesive Removal Wipe (ConvaTec Inc)
– Comes in wipes
Tac Away Adhesive Removal Wipes (Torbot)
– Comes in wipes
– Reciprocal product to Skin Tac
Detachol Adhesive Remover (Eloquest)
– Latex free, alcohol free
– Comes in single use vials or liquid
– Reciprocal product to Mastisol
Household oilsa:
– Baby oil, coconut oil or olive oil
– Least specialized and least expensive option
 
*This paper was based on: Messer L., & Beatson C., Preserving Skin Integrity with Chronic Diabetes Technology & Therapeutics Volume 20, Supplement 2, 2018.
 
1. Chase HP, Messer L: Understanding Insulin Pumps and Continuous Glucose Monitors. 3rd ed. Denver: Children’s Diabetes Research Foundation, 2016
 
2. McNichol L, Lund C, Rosen T, Gray M: Medical adhesives and patient safety: State of the science: consensus statements for the assessment, prevention, and treatment of adhesive related skin injuries. J Wound Ostomy Continence Nurs 2013;40:365–380; quiz E361–E362. a Used within institution or support in public commentary, online articles, diabetes blogs, social media.
 
Failure to use the Dexcom G6 Continuous Glucose Monitoring System (G6) and its components according to the instructions for use provided with your device and available at https://www. dexcom.com/safety-information and to properly consider all indications, contraindications, warnings, precautions, and cautions in those instructions for use may result in you missing a severe hypoglycemia (low blood glucose) or hyperglycemia (high blood glucose) occurrence and/or making a treatment decision that may result in injury. If your glucose alerts and readings from the G6 do not match symptoms, use a blood glucose meter to make diabetes treatment decisions. Seek medical advice and attention when appropriate, including for any medical emergency
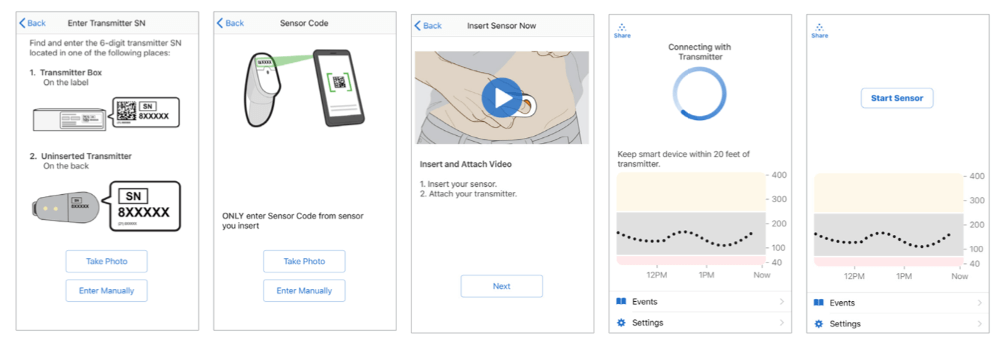
The Dexcom G7 sensor is factory calibrated. The 4-digit pairing code found on the G7 Wearable box and Applicator connects your G7 sensor to your smart device or receiver through bluetooth.
 
The Dexcom G6 sensor has two modes:
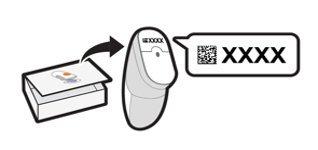
  • Factory calibration: Enter the 4-digit sensor code found on the G6 sensor you are applying. This provides the highest level of accuracy without the need to enter BG readings.
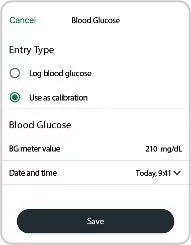
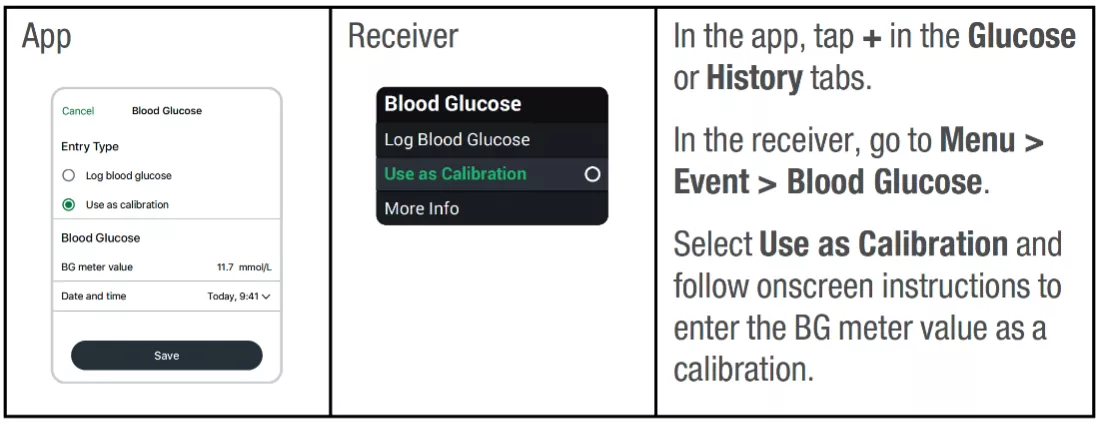
  • Manual calibration: Don’t enter the 4-digit sensor code. You’ll be prompted to enter BG meter values after the 2-hour warm up, then every 12 hours of the first sensor day and then once a day for the remaining nine days of the sensor session.
 
*Compatible smart devices sold separately. To view a list of compatible devices, visit dexcom.com/compatibility
  1. At the bottom of the TempoSmart app screen, select More from the menu.
  2. Click on Connections and Devices.
  3. Click on Continous Glucose Monitor.
  4. Click on CGM Data by Dexcom, and follow the directions provided.
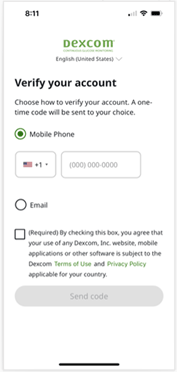
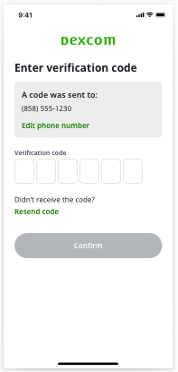
To create a Dexcom account, we have to verify your identity. This is a safety measure that helps protect your personal information.
 
Before May 2023, Dexcom sent verification codes via email only. Now, you can create your account using your mobile phone number, and Dexcom will send a text message with your verification code. This option is available only to new Dexcom G7 users who sign up after May 2023.
 
If you sign up with your mobile number, it becomes your Dexcom user ID. You’ll use it to log in to all Dexcom apps and services.


To set up and verify your account using your mobile number, simply:
  1. Tap Mobile phone.
  2. Select your country (country code) and enter your phone number.
  3. If you accept the Terms of use and Privacy policy, tap the box.
  4. Tap Send code.
 
 
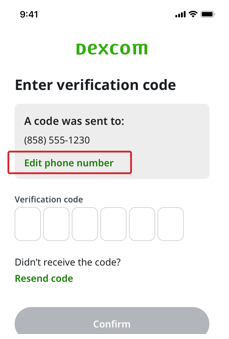
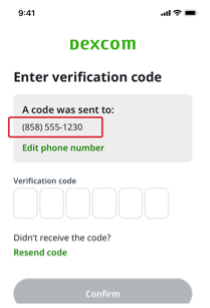
When you get the code:
  1. Enter it.
  2. Tap Confirm.
  3. Follow instructions on the remaining screens to finish setting up your account.
 
Troubleshooting


I entered my mobile number incorrectly.
  1. Tap Edit phone number.
  2. Re-enter your mobile number.
  3. Follow onscreen instructions to continue.


I didn’t get a code.
  1. Confirm that your phone number is correct.
  2. Tap Resend code.
 
What’s the benefit of using my mobile number to create my account?
 
If you use your mobile number, you don’t have to leave the app to check your email for a verification code. This makes the process faster, so you can start using your Dexcom Continuous Glucose Monitor (CGM) more quickly.
 
Do my mobile number country code and my country of residence have to match?
 
No, you have the flexibility to enter any mobile number you have access to. You aren’t limited to using a mobile number with a country code that matches your country of residence.
 
If I create an account with my mobile number, will I get marketing or promotional text messages from Dexcom?
 
Dexcom will send account-related text messages only. We’ll ask for your explicit consent before sending any marketing or promotional text messages.
 
Are all customers required to share their mobile number?
 
No, outside the US, Dexcom asks for a mobile number ONLY if you choose to verify your account via text message. If you live outside the US and create your account using your email, you won’t be asked for a mobile number.
 
Does signing up with my mobile number affect how I log in?
 
Yes. If you sign up with your mobile number, it becomes your Dexcom user ID. You’ll use it to log in to all Dexcom apps and services.
 
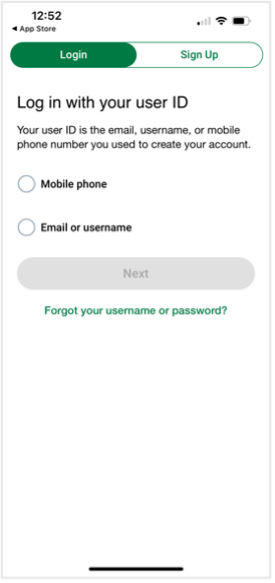
Log in with your mobile number


On the log in screen:
  1. Tap the circle next to Mobile phone.
  2. Choose your country and enter your mobile number.
  3. Tap Next.
 
On the next screen:
  1. Enter your password.
  2. Tap Log in.
 
On the log in screen:
  1. Tap the circle next to Mobile phone.
  2. Choose your country and enter your mobile number.
  3. Tap Next.
 
On the next screen:
  1. Enter your password.
  2. Tap Log in.
 
I’m creating my account using my mobile number. Why are you also asking for my email address?
 
Dexcom sends out important educational and support information covering your first 10 days with your new CGM system. So even if you’re using your mobile number to create and verify your account, Dexcom asks for your email address and sends an email verification. Please verify your email as soon as possible, so we can get you the information you need to use your system safely and effectively.
 
Can all Dexcom users log in with their mobile number?
 
No. You can’t log in with your mobile number unless you used it to create and verify your Dexcom account. You can log in with your mobile number if all the following are true:
  1. You are above legal age.
  2. You created a new Dexcom account after May 2023.
  3. You verified your account with a text message sent to your mobile number.
 
I’m a current Dexcom user transitioning to a different Dexcom CGM system. Can I update my user ID and log in with my mobile number?
 
No. The unique user ID you created when you set up your account is linked to all your glucose information. It can’t be changed.

Yes, you’ll need to put in the sensor code from the sensor each time you start a new one. The sensor code is found on the bottom of the applicator on the adhesive strip.

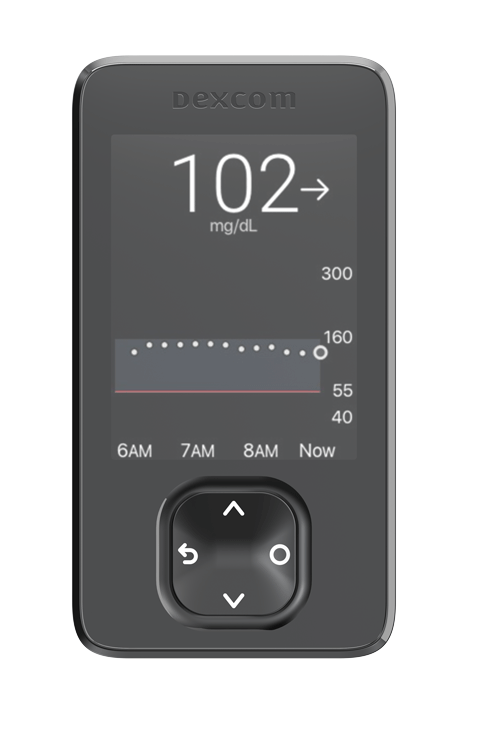
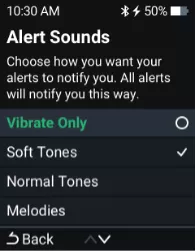
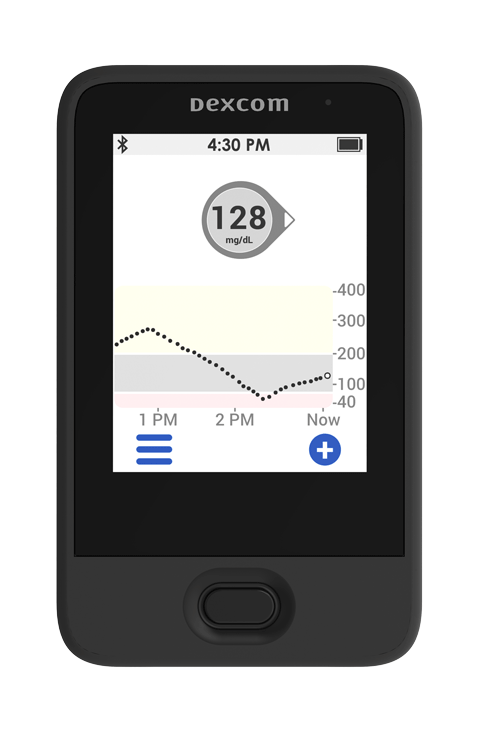
The two Dexcom receivers have different hardware, which makes it easy to tell them apart.


Dexcom G6 Touchscreen Receiver
 
 
NEW Dexcom G6/G7 Receiver
Please note that images are not to scale.
 
The Dexcom G6 Touchscreen Receiver can not be upgraded to G7.
The New Dexcom G6 Receiver can be upgraded from G6 to G7.
 
Please reference Dexcom G6 Touchscreen Receiver user guide here.
Please reference new Dexcom G6 Receiver user guide here.
Please reference new Dexcom G7 Receiver user guide here.

The Urgent Low Soon alert can warn users in advance (within 20 minutes) of a severe hypoglycemic event (55 mg/dL), which helps give them time to take appropriate action before an event occurs.

New features with Dexcom G7
Dexcom G6 features included with Dexcom G7
  1. 60% smaller, all-in-one, discreet# wearable, easier to use with fewer components
  2. 30-minute sensor warm up, the fastest of any CGM on the market**
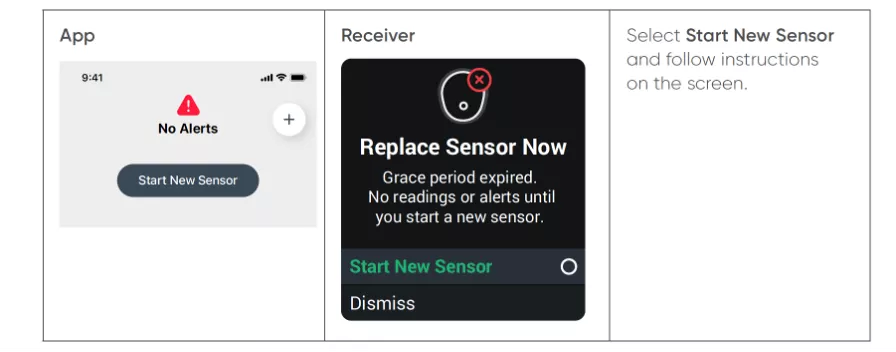
  3. 12-hour grace period to replace finished sensors for a more seamless transition between sessions
  4. Redesigned and simplified mobile app with Dexcom Clarity integration††,‡‡
  5. Improved alert settings for enhanced discretion
  6. Redesigned optional receiver¶¶ that is smaller with a more vibrant, easier to read display
  7. Indicated for wear on the back of the upper arm for ages 2 years and older or the upper buttocks for ages 2-6 years.
  8. Smaller plastic components and packaging, resulting in less waste than Dexcom G61
 
  1. No fingersticks/finger pricks,§ scanning or calibration
  2. Real-time glucose readings sent automatically every 5 minutes to a compatible display device
  3. Capable of Integration with the world’s largest connected CGM ecosystem1 (including Apple Watch, Garmin, and other digital health apps)
  4. Remote monitoring, enabling users to share glucose data with up to 10 Followers
  5. Proven Dexcom accuracy and performance4
  6. Only CGM to offer a predictive low alert that can recognize potentially dangerous hypoglycemic incidents before they occur
 
 
§Fingersticks required for diabetes treatment decisions if symptoms or expectations do not match readings.
 
¶¶ Medicare coverage requires use of receiver
 
*Smart device, sold separately, required to display readings on watch. †Compatible smart devices sold separately. For a list of compatible devices, visit dexcom.com/compatibility. ‡Dexcom G7 can complete warmup within 30 minutes, whereas other CGM brands require up to an hour or longer. ||Results obtained with a prior generation Dexcom CGM System. ¶Separate Follow app and internet connection required. Users should always confirm readings on the Dexcom G6 app or receiver before making treatment decisions. #Compared to a prior generation Dexcom CGM System. **Dexcom G7 can complete warmup within 30 minutes, whereas other CGM brands require up to an hour or longer. ††Healthcare providers can register for Dexcom Clarity at clarity.dexcom.com/professional/ registration. ‡‡An internet connection is required for patients to send their glucose data to Dexcom Clarity via a compatible smart device: dexcom.com/compatibility. Healthcare providers will only be able to view a patient’s glucose data if the patient elects to share it with them through Dexcom Clarity. §§Comparison of NPS scores of Dexcom, Abbott, and Medtronic, Seagrove Survey 2021 Patient Perspectives.
 
1 Dexcom, data on file, 2022.
2 Beck, RW, et al. JAMA. 2017;317(4):371-378.
3 Welsh JB, et al. J Diabetes Sci Technol. Jun 13 2022:19322968221099879.
4 Dexcom G7 CGM System User Guide. 2022.
5 Managed Markets Insights & Technology, LLC. MMIT Analytics, June 2022.
6 dQ&A US Q1 2021 Diabetes Connections Patient Panel Report. 2021;69-72.
Continuous Glucose Monitoring (CGM) systems track glucose levels throughout the day. When used, a tiny sensor wire is inserted just underneath a person’s skin using an automatic applicator. An adhesive patch holds the CGM sensor housing in place, so the sensor can measure glucose readings in interstitial fluid throughout the day and night. A small, reusable transmitter connects to the sensor wire and sends real-time readings wirelessly to a receiver, so that the user can view glucose information. Some systems also allow compatible smart devices to work with the CGM system app as display devices. Then, the receiver or compatible smart device* is able to display real-time glucose levels and historical trends. The CGM receiver and/or compatible smart device can also be set to send custom alerts to the user when certain glucose thresholds are reached.
 
*To view a list of compatible smart devices, visit dexcom.com/compatibility.
The A1C test, also known as a glycohemoglobin or hemoglobin (Hb) A1C test, tells you how well you are managing your diabetes by measuring your average blood glucose (sugar) control for the few months prior to the blood test. Normal A1C is between 4% and 6% for a person who does not have diabetes. Your doctor can provide you with your ideal A1C target. A higher A1C increases the risk of complications, including heart attacks, strokes, neuropathy and more, so keeping your blood glucose and A1C in your target range helps lower your risk of complications.
 
Source:
https://www.joslin.org/patient-care/diabetes-education/diabetes-learning-center/a1c-test
Type 1 diabetes (T1D) is an autoimmune disease that occurs when the body’s own immune system mistakenly destroys insulin-producing cells in the pancreas. Without insulin, cells throughout the body cannot take up energy from glucose, which leads to health complications such as high blood sugar (hyperglycemia), low blood sugar (hypoglycemia), and long-term damage to nerves, vision, and vital organs.
 
Although T1D typically appears during childhood or adolescence, anyone can be at risk. According to the American Diabetes Association, more than 1.25 million Americans are living with T1D and 40,000 will be newly diagnosed each year.
 
Unfortunately, there is currently no cure or methods of prevention for type 1 diabetes.
 
Sources:
https://www.jdrf.org/t1d-resources/about/facts/
https://www.jdrf.org/t1d-resources/about/
http://www.diabetes.org/diabetes-basics/statistics/
Although type 2 diabetes is not totally preventable, making healthy lifestyle decisions like dietary changes, increased exercise, and weight loss can help lower your chances of developing it. Those choices can also help prevent further health complications in people with type 2 diabetes and can also help slow or stop the progress of prediabetes. Here are some tips for lifestyle changes:
 
  • Eat healthy foods like fruit, vegetables, and whole grains. These are lower in fat and calories, and higher in fiber than other foods.
  • Aim for a minimum of 30 minutes of exercise every day, with activities like fast walking, bicycling, or swimming laps.
  • Lose extra body weight (7% loss) if overweight to help decrease your risk of diabetes. This can also increase your energy level, improve your self-esteem, and keep your heart heathy.
 
Source:
https://www.mayoclinic.org/diseases-conditions/type-2-diabetes/symptoms-causes/syc-20351193
Researchers are still investigating what causes the onset of type 1 diabetes (T1D). While genetics and family history contribute to your predisposition to developing T1D, an external environmental trigger is also needed to initiate the disease.
 
There are 20-40 gene markers linked to T1D. In most cases, people with diabetes inherit these genetic risk factors from both parents. However, genes aren’t the only cause of T1D. Consider identical twins with identical genes—the American Diabetes Association reports that when one twin has T1D, the other will only contract it up to 50% of the time.
 
Cold weather and lack of sunshine may be a contributing factor to T1D. Cases of T1D tend to arise most often in autumn and winter. Furthermore, the incidence of T1D tends to increase in people who live farther away from the equator.
 
Early diet may also be related. Fewer cases of T1D arise in children who were breastfed as babies and waited until later years to eat solid foods.
 
Some viruses may activate T1D in someone who is susceptible. A virus that has only mild effects on most people may trigger type 1 diabetes in others.
 
Sources:
http://www.diabetes.org/diabetes-basics/genetics-of-diabetes.html
https://dlife.com/type-1-diabetes-genetic-hereditary-causes-treatment/
https://www.mayoclinic.org/diseases-conditions/type-1-diabetes/symptomscauses/ syc-20353011
https://www.ncbi.nlm.nih.gov/pmc/articles/PMC4038357/
A fasting blood sugar (FBS) level is the result of a blood sample taken after a patient fasts for at least eight hours. A normal fasting blood sugar level for someone without diabetes is less than 100 mg/dL, or HbA1C below 5.7%.
 
Prediabetes is a fasting blood sugar level from 100 to 125 mg/dL, or HbA1C of 5.7%-6.4%. Diabetes is a fasting blood sugar level of 126 mg/dL and above, or HbA1C of 6.5% or higher.
 
Source:
https://www.mayoclinic.org
Signs and symptoms of type 1 and type 2 diabetes can include increased thirst and urination, increased appetite, loss of weight, fatigue, change in vision, frequent infection, and patches of darkened skin.
 
Type 2 diabetes occurs when a person has blood glucose (sugar) levels that are higher than normal and their body does not use insulin properly. Causes include genetics and environment and can also include being overweight, but not all patients with type 2 diabetes are overweight.
 
Source:
http://www.mayoclinic.org
According to the American Diabetes Association (ADA) guidelines, patients with diabetes should strive to achieve fasting blood glucose levels below 131 mg/dL, and levels following meals below 180 mg/dL. Ideally, patients with diabetes can bring their blood glucose levels as close to normal as possible with lifestyle changes and medication. ADA guidelines recommend HbA1C levels below 7%, or an average blood glucose level below 154 mg/dL.
 
Sources:
http://www.mayoclinic.org, https://www.health.harvard.edu
Hypoglycemia is low blood sugar (glucose). The National Institute of Health suggests this is a level of 70 milligrams per deciliter (mg/dL) or fewer, but ranges of when hypoglycemia symptoms occur vary with every individual. Hypoglycemia can bring on symptoms of shakiness, nervousness, sweating, and hunger. In more severe episodes, an individual may appear intoxicated–with slurred or incoherent speech, impaired motor function, and/or forgetfulness. If left untreated, hypoglycemia can induce a coma.
 
Hypoglycemic episodes can occur when people with diabetes take too much insulin without food, when they exert too much physical activity, or when they drink alcohol. If a person has had diabetes for a long time, they can also develop hypoglycemic unawareness, or the inability to sense low blood sugar levels. Regularly monitoring blood glucose levels, taking insulin doses according to physician instructions, and not skipping meals can help prevent hypoglycemic episodes.
 
Sources:
http://www.diabetes.org/living-with-diabetes/treatment-and-care/blood-glucose-control/hypoglycemia-low-blood.html
https://www.mayoclinic.org/diseases-conditions/hypoglycemia/symptoms-causes/syc- 20373685
Symptoms related to type 1 diabetes (T1D) build over time or come on suddenly, sometimes within just a few weeks when the disease reaches a critical point. Some signs can include:
 
  • Frequent urination
  • Increased thirst
  • Increased hunger/appetite
  • Dry mouth
  • Itchy or dry skin
  • Unexplained weight loss
  • Yeast infections
  • Irritability and other mood changes
  • Extreme fatigue and weakness
  • Vision changes or blurred vision
 
T1D is a condition in which the pancreas is unable to produce insulin – the hormone that enables your cells to extract energy from the food you eat. Without insulin to properly process sugars from food, excess glucose can accumulate in your blood. Your kidneys may prompt frequent urination to clear the excess glucose. More water is then needed to then stave off dehydration, so excessive thirst, dry mouth and dry skin can occur.
 
Hunger pangs can be a result of your body craving energy. Since cells are unable to properly take in energy in the form of glucose, your body calls for more food to compensate. Even though you may be eating more as a person with type 1 diabetes, you may still lose weight because your body begins to burn fat and muscle to find the energy it needs to function. Since your cells are deprived of energy, you may feel tired and weak.
 
High levels of glucose can cause the lens of your eye to change shape, creating blurry vision. Over the course of time, it can also damage blood vessels on the retina, which leads to the appearance of floaters or even total vision loss.
 
Excess glucose in the blood also affects blood flow to the cells and tissues, especially to the extremities. This can create complications like slow-healing wounds, infections, and nerve damage.
 
Talk to your doctor about blood tests to confirm if you have diabetes.
 
Sources:
http://www.diabetes.org/diabetes-basics/symptoms/signs-and-symptoms-of-type- 1_adults.html
https://www.mayoclinic.org/diseases-conditions/type-1-diabetes/symptoms-causes/syc- 20353011
https://dlife.com/type-1-diabetes-symptoms-signs/
https://www.aao.org/eye-health/tips-prevention/diabetes
Diabetes mellitus is a group of diseases that are characterized by abnormally high blood glucose levels, resulting from defects in insulin secretion, insulin action, or both. Mechanistically, type 1 diabetes (T1D) results from immune-mediated, pancreatic β-cell destruction and type 2 diabetes (T2D) is generally multifactorial, resulting from increasing insulin resistance, diminishing insulin production (relative or absolute), and impairments in glucose metabolism. While type 2 diabetes is strongly correlated with obesity, not all patients with type 2 diabetes are overweight.
 
Signs and symptoms of type 1 and type 2 diabetes can include increased thirst and urination, increased appetite, loss of weight, fatigue, change in vision, frequent infection, and patches of darkened skin.
 
Source:
https://www.mayoclinic.org/diseases-conditions/diabetes/symptoms-causes/syc-20371444
A continuous glucose monitoring (CGM) system offers individuals with type 1 or type 2 diabetes around-the-clock glucose readings with fewer fingersticks–or, depending on the CGM product you choose, none at all.*,† This level of timely feedback from glucose monitors can help users make more informed treatment decisions that may help reduce their A1C levels.1
 
Advantages of Continuous Glucose Monitors
 
Whether you treat your diabetes with multiple daily injections or an insulin pump, you can expect wide-ranging health and convenience benefits from using a CGM device. The benefits of using the Dexcom CGM system include the following:
 

More insight than using a meter alone

  • Unlike a single reading from a blood glucose meter, a CGM provides real-time, dynamic information about the speed and direction (trending higher or lower) of your glucose levels.


Improved glycemic control

  • Having continuous feedback on diet, exercise, and insulin requirements from a CGM can help you make more informed treatment decisions. This awareness can lead to tighter glycemic control than using a blood glucose meter alone.2


Fast, proactive response

  • The Dexcom CGM systems take glucose readings every 5 minutes and allows you to set customizable thresholds with alerts when your readings are out of target range. This means you could know that you are out of range before you begin to feel symptoms, and you can proactively respond.


Fewer fingersticks

  • CGM devices use a tiny sensor to measure glucose levels just beneath the skin. The sensor connects to a transmitter, which wirelessly transmits readings to a receiver or a compatible smart device.‡ At any time, you can see your glucose reading with just a glance.


Fewer worries

  • Hear from real Dexcom users about the feelings of freedom and control they have using continuous glucose monitoring systems.
 
1 Beck RW, Riddlesworth T, Ruedy K, et al. Effect of Continuous Glucose Monitoring on Glycemic Control in Adults With Type 1 Diabetes Using Insulin Injections: The DIAMOND Randomized Clinical Trial. JAMA. 2017;317(4):371-378. doi:10.1001/jama.2016.19975.
2 Pettus J, Price DA, Edelman SV. How Patients with Type 1 Diabetes Translate Continuous Glucose Monitoring Data into Diabetes Management Decisions. Endocr Pract. 2015; 1-25.
*Fingersticks required when symptoms or expectations do not match CGM readings.
†Available with the Dexcom G6 CGM System.
‡To view a list of compatible smart devices, visit dexcom.com/compatibility
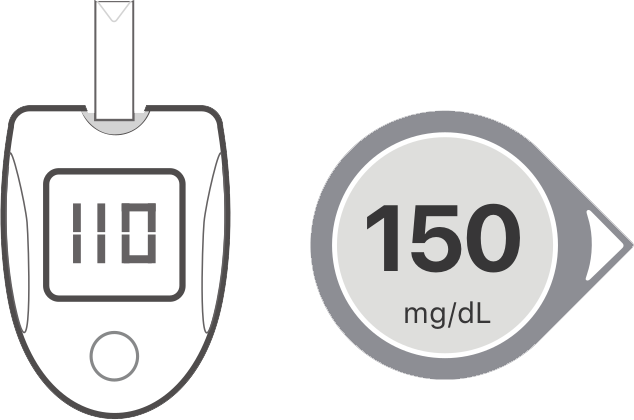
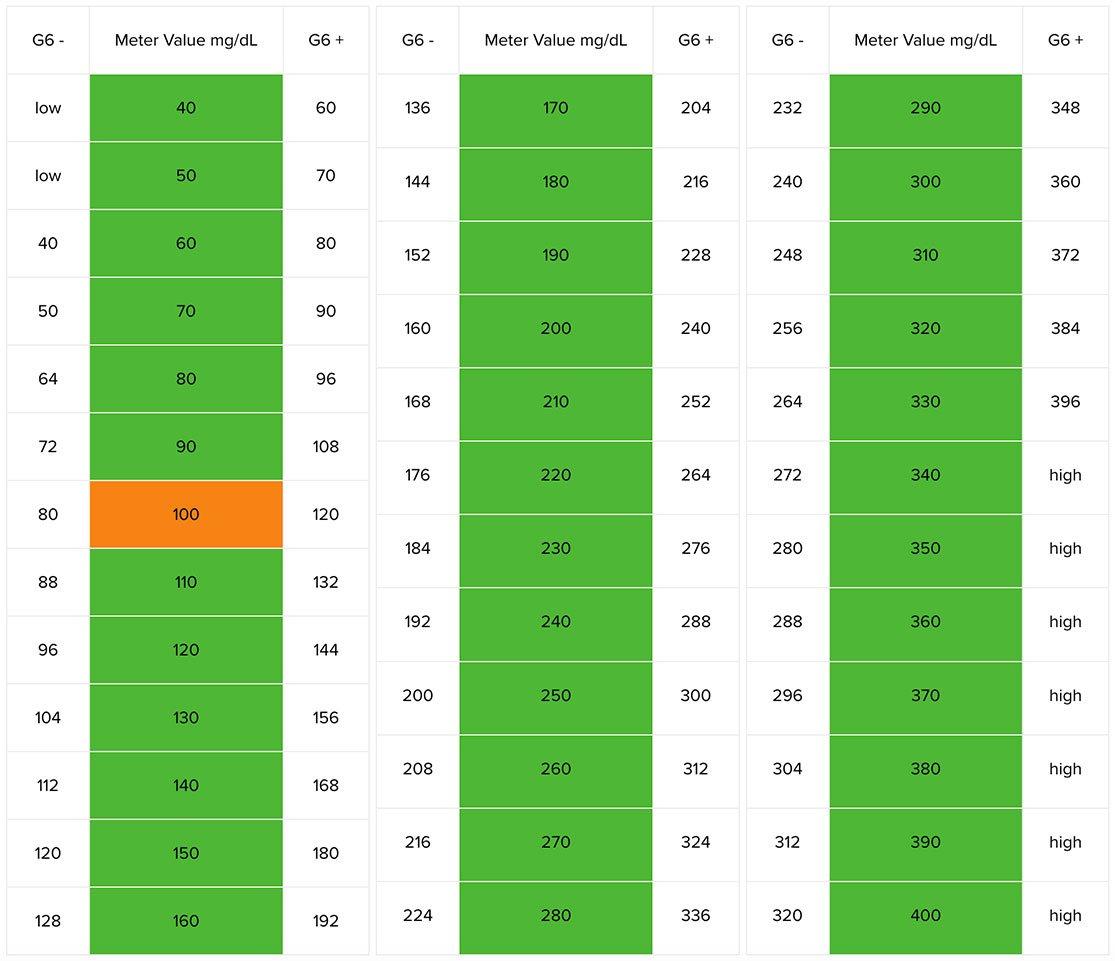
Dexcom CGM systems provide much more information for users than traditional Self-Monitoring of Blood Glucose (SMBG) does. For Dexcom G6 users, the expected level of accuracy is based on comparisons to fingerstick results–which require careful consideration of timing and technique consistency when drawing blooding glucose values.
 
For a more detailed explanation, please review this guide.
The most common symptoms of type 2 diabetes (T2D) are:
 
  • Increased thirst
  • Frequent urination
  • Increased hunger/appetite
  • Unexplained weight loss
  • Fatigue, or a feeling of being run-down and tired
  • Rapid breathing
  • Blurred vision
  • Dry, itchy skin
  • A headache
  • Tingling or burning pain in the feet, legs, hands or other parts of the body
  • High blood pressure
  • Mood swings
  • Irritability, depression
  • Frequent or recurring infections, such as urinary tract infections, yeast infections and skin infections
  • Slow healing of cuts and bruises
 
Symptoms of T2D are very similar to symptoms of type 1 diabetes (T1D). However, T2D symptoms often come on more gradually; not everyone with T2D will display signs of having the disease. Blood tests are needed to confirm diabetes.
 
Source:
https://www.mayoclinic.org/diseases-conditions/type-2-diabetes/symptoms-causes/syc-20351193
https://dlife.com/type-2-diabetes/
Medicare requires the use of the receiver for their patients. For all other payers, the patient has the choice of what device to view their numbers. Users can also view their numbers on both their phone* and receiver if they choose.
 
*Compatible smart devices sold separately. To view a list of compatible smart devices, visit dexcom.com/compatibility

As with all previous generations of Dexcom CGM, Dexcom G6 will eventually be discontinued. Until then, G6 will still be available, and we are working closely with all our partners to transition users from G6 to G7 as smoothly and as efficiently as possible.

You must have a Dexcom account to use Dexcom Clarity. You must use the same Dexcom account for all your Dexcom devices. Do not create a duplicate Dexcom account or your data will not be found. If you are unsure if you have an account, try to recover the login. You already have a Dexcom account if you:
 
  • Use the Dexcom CGM app
  • Upload your Dexcom receiver to Dexcom Clarity at home
 
You can reset your Dexcom username and password if needed. Please do not create a second Dexcom account.
 
Go to clarity.dexcom.com from an internet browser with internet connection. Review Clarity’s list of computer and internet configurations if needed.
 
Dexcom Clarity app is available from the app store of smart devices.
 
Click the links below to download the Dexcom Clarity app to your compatible smart device. For a list of compatible devices  click here.
 
 
A broadband network connection of 1.5 Mbps or more is required to install the software from the web, upload data or view the online User Guide.
 
It is recommended that you use an appropriate firewall program and an anti-virus program on your computer to protect against viruses, malware and unauthorized access to and use of your computer and the information stored, processed, and transmitted by it.
 
Dexcom Clarity supports the following system configurations:
Windows 8, or 10
  • 1.3 GHz processor, 1 GB free RAM, and 100 MB free disk space
  • Microsoft .NET Framework 4.6.1 or greater, full version
  • Display resolution of 1024 x 768 pixels or greater
  • Chrome, Firefox, or Internet Explorer 11 run in desktop mode or Microsoft Edge
  • USB 2.0+ port or better to connect the USB cable to upload data from the optional Dexcom receiver
 
Mac OSX 10.14 or 10.15
  • 2.3 GHz processor and 4 GB free RAM with 100 MB free disk space
  • Display resolution of 1280 x 800 pixels or greater
  • Chrome, Firefox for Mac OSX, or Safari 12, 13, and 14
  • USB 2.0+ port or better to connect the USB cable to upload from the optional Dexcom receiver
 
Optional computer configurations:
  • A PDF reader for viewing, saving, and printing reports
  • A printer for printing reports
  • An Excel spreadsheet viewer for exported data
 
To run Dexcom Clarity, your network must allow the following outbound network traffic, which might require changes to proxy and network configuration:
  • dexcom.com (and all subdomains) on port 443
  • agent.mydiabetesdata.com with DNS loopback support to 127.0.0.1
 
To run the Dexcom Clarity Uploader, your network must allow the following outbound network traffic:
  • *.dexcom.com (and all subdomains) on port 443

Use Settings to customize data display and sharing. Changes only apply to Dexcom Clarity and do not change any settings on your Dexcom CGM system.

All data uploaded to Dexcom Clarity will remain accessible as long as the product is available for use. When logging in to Dexcom Clarity for the first time, there will be limited data depending on when the account was created. Going forward, data will continue to build as it is uploaded to Dexcom Clarity.

Under the Devices section of Dexcom Clarity’s Overview report you will find the alert settings and last uploads for the CGM systems used. Device settings are for your reference and are separate from Dexcom Clarity settings. This information can only be found on the web version of Dexcom Clarity at clarity.dexcom.com

For every release, a notification banner is posted at the top of the Dexcom Clarity on the day of the release. Follow the banner’s link to read the release notes. If the Dexcom Uploader software is updated, the notification banner posts 2 weeks before the release.
 
For app releases, read the Dexcom Clarity What’s New description from your smartphone’s app store.
Dexcom Clarity app generates PDF reports for 2, 7, 14, 30, or 90 days. You can select any or all of the available reports to view, save, print, or email.
 
To view reports:
  1. Tap Reports.
  2. Tap 2, 7, 14, 30 or 90 days.
  3. Tap the reports you want to view.
  4. Tap Tap view Reports.
 
Use the icons at the top to save, print, or email reports.

Yes, you can generate PDFs for all Dexcom Clarity reports to view, save, print, or email.

See how metrics are calculated in Dexcom Clarity in the Glossary.

The smartphone system sends data to the Dexcom server, where that data is made available for reports. To receive this data, the smartphone needs to be connected to the internet and have the Dexcom Mobile CGM app running.
 
The Dexcom receiver requires connection to a computer to upload the data periodically. If you use a smartphone part of the time and a receiver part of the time, then Dexcom Clarity needs data from both to provide accurate statistics.
 
It is possible to use both a smartphone and a receiver to provide CGM data.

If you enter events such as carbs or exercise on both your receiver and your smart device, then both the receiver and the smart device must be uploaded to Dexcom Clarity to show complete data and accurate statistics.

This is a summary of a clinical article published by clinicians independent from Dexcom based on their knowledge and experience.* Dexcom has not tested these approaches nor do we endorse these specific approaches. For detailed step-by-step instructions on how to use your Dexcom Continuous Glucose Monitoring (CGM) System, please refer to your user guide.
 
Are you a swimmer, runner, or do you just have trouble with your sensor staying on? These adhesives and professional tips may help. Remember, what works best for one person may not work well for everyone. You may need to try several different products or methods to figure out what works best for you.
 
Liquid Adhesive Agents
 
Liquid adhesive agents can be used with the sensor adhesive patch1,2. Suggestions when using liquid adhesive agents are to:
  • Create an empty oval on the skin with the liquid adhesive product. Let skin adhesive dry. Insert sensor on clean skin in center of oval.
  • Or you may also soak the liquid adhesive into tape after placement on your body
 
 
Product
Advantages
Professional tips
No-Sting skin Prep
(Smith&Nephew)
 
 
-Provides barrier protection
– Comes in wipes or liquid
– Not as strong as Skin Tac or Mastisol
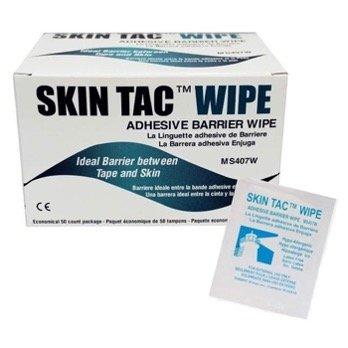
Skin Tactm(Torbot)
 
– Provides barrier protection
– Higher adhesive properties than Skin Prep
– Latex-free, hypoallergenic, nonrubber adhesive
– Comes in wipes or liquid
– Consider use of reciprocal removal product – Tac Away
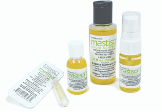
Mastisol® Liquid Adhesive
(Eloquest)
 
– Higher adhesive properties than Skin Prep or Skin Tac
– Comes in liquid, swabs, or single use vials
– Consider use of reciprocal removal product -Detachol
 
Adhesive Patches or Tapes
 
Additional adhesive patches or tape can be applied over the sensor adhesive patch1,2. Suggestions when using adhesive patches or tapes are to:
 
  • Cut a hole in the adhesive patch or tape to fit over transmitter
  • Cut the adhesive patch or tape into strips to use ‘‘picture frame’’ technique around sensor adhesive patch1,3
 
 
Product
Advantages
Professional tips
IV3000 (Smith&Nephew)
 
– Thin transparent film
– May cause fewer reactions than Tegaderm
– May also be used as a barrier when placed under sensor tape
– Not breathable, may peel with sweating or if water gets under
Tegaderm HP (HP stands for ‘‘Holding Power’’)
 
– Thin transparent film
– May adhere more strongly than standard Tegaderm
– Not breathable, may peel with sweating or if water gets under
Hypafix®
 
 
– Thicker, fabric-like adhesive than transparent films
– Can be cut to size
– Excellent adhesion even when wet
– Excellent staying power and thickness
– May cause less trauma to skin upon removal2
Opsite™/Opsite
Flexifit™ (Smith&Nephew)
 
– Breathable, transparent film with moderate permeability
– Can come as precut patches or in a roll
Blenderm™ (3M)
 
– Clear plastic hypoallergenic tape
– Comes in a tape roll, best used as a supplement to counteract peeling patch
Transpore™ Surgical Tape
 
– Clear, porous, plastic hypoallergenic tape
– Comes in a tape roll, best used as a supplement to counteract peeling patch
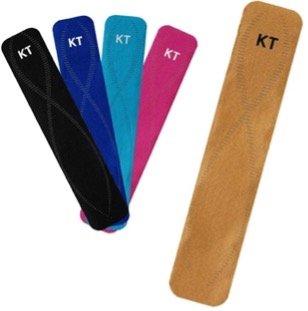
Kinesiology tape:
  • RockTape®
  • KT Tape
 
 
– Comes in a roll for custom cutting
– Gentle on skin with mild stretch
– Similar material to RockaDex and GrifGrips
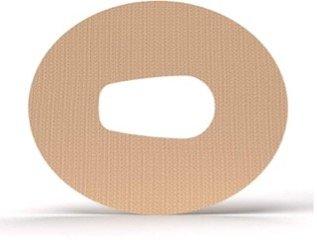
Cloth-like patches:
  • GrifGrips®
  • RockaDex
  • Simpatch™


– Precut for CGM
– Flexible and breathable
– Excellent adhesion even when wet
– Bright colors and shapes
– Similar materials to kinesiology tapes and may be stretched or cut to fit a variety of devices and body shapes
Nonadhesive wraps:
  • Coban
  • Ace
  • Bands4Life
 
 
– If you are unable to tolerate additional adhesive, wraps may help keep your sensor in place
– Wrap loosely, do not compress skin with elastic wraps
– Remove during nighttime to avoid tissue compression
– Consider for short-term use—during sports, activity, etc.
 
 
*This paper was based on: Messer L. , & Beatson C., Preserving Skin Integrity with Chronic Diabetes Technology & Therapeutics Volume 20, Supplement 2, 2018.
1. Chase HP, Messer L: Understanding Insulin Pumps and Continuous Glucose Monitors. 3rd ed. Denver: Children’s Diabetes Research Foundation, 2016.
2. Englert K, Ruedy K, Coffey J, et al.: Skin and adhesive issues with continuous glucose monitors: a sticky situation. J Diabetes Sci Technol 2014;8:745–751.
3. Ives B, Sikes K, Urban A, et al.: Practical aspects of realtime continuous glucose monitors: the experience of the Yale Children’s Diabetes Program. Diabetes Educ 2010;36: 53–62.
 
Failure to use the Dexcom G6 Continuous Glucose Monitoring System (G6) and its components according to the instructions for use provided with your device and available at https://www. dexcom.com/safety-information and to properly consider all indications, contraindications, warnings, precautions, and cautions in those instructions for use may result in you missing a severe hypoglycemia (low blood glucose) or hyperglycemia (high blood glucose) occurrence and/or making a treatment decision that may result in injury. If your glucose alerts and readings from the G6 do not match symptoms, use a blood glucose meter to make diabetes treatment decisions. Seek medical advice and attention when appropriate, including for any medical emergency.

Dexcom G7 FAQs

Yes, Dexcom G7 can be worn during pregnancy for all types of diabetes (type 1, type 2, or gestational).

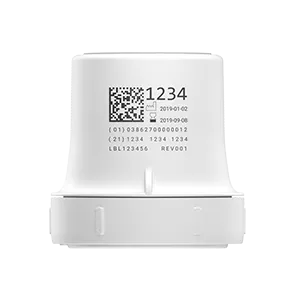
Dexcom G7 is factory calibrated. Unlike G6 sensors, the G7 sensors are pre-programmed with the factory calibration setting so you don’t need to enter a sensor code. However, you will still need to enter the 4-digit pairing code provided on the body of each new G7 applicator to pair a sensor to your compatible smart device* or receiver.

g7 applicator ortho rear with label 300x300 1 medical by baby's on broadway at baby’s on broadway, we understand the importance of reliable and durable medical equipment in your healthcare journey; whether it’s for you or someone you care about.

*Compatible smart devices sold separately. To view a list of compatible smart devices, visit dexcom.com/compatibility

You should never close or quit the Dexcom G7 app.
 
To get your glucose readings and alerts—or to share with your followers†,‡—the app must run in the background.
 
Open the app by tapping its icon. Safely leave the app by using the Home button; on newer iPhones without a Home button, swipe up to navigate to the Home screen. This will allow the app to run in the background.

Dexcom G7 is for patients two years and older with any type of diabetes including type 1, type 2, or gestational diabetes.

Dexcom G7 offers a better way to help people gain greater control of their diabetes, so they can more confidently manage it each day. Its low-profile, all-in-one wearable sensor warms up faster than any other CGM on the market, sending real-time glucose readings automatically to a compatible smart device† or Dexcom receiver, no fingersticks§ required. Dexcom G7 also offers a suite of customizable alerts that can warn of high or low glucose levels and help you spend more time in range.||,2,3 Industry-leading remote monitoring and reporting capabilities also allow users to stay connected with their loved ones and care teams anytime, anywhere.
 
§Fingersticks required for diabetes treatment decisions if symptoms or expectations do not match readings.
 
*Smart device, sold separately, required to display readings on watch. †Compatible smart devices sold separately. For a list of compatible devices, visit dexcom.com/compatibility. ‡Dexcom G7 can complete warmup within 30 minutes, whereas other CGM brands require up to an hour or longer.
 
||Results obtained with a prior generation Dexcom CGM System.¶Separate Follow app and internet connection required. Users should always confirm readings on the Dexcom G6 app or receiver before making treatment decisions.
The Android Bluetooth implementation we use for OS 10 and 11 requires you to give us this level of Location Permission, so we can connect and communicate continuously with the Dexcom G7 sensor. While this permission can be used to share location data, Dexcom does not use it in this way.
 
*Compatible smart devices sold separately. To view a list of compatible smart devices, dexcom.com/compatibility

At security checkpoints


You can wear your Dexcom G7 sensor when going through walk-through metal detectors and Advanced Imaging Technology (AIT) body scanners. Alternatively, you may ask for hand-wanding or a full-body pat-down and visual inspection. Ask for visual inspection of any part of your Dexcom G7 in the baggage scanning machine.
 
Most security check points require you to temporarily give up your smart device* and receiver.
 
Dexcom G7 is safe to go through luggage scanning and will not affect product performance. To help you prepare for airport security checks and screening procedures for air travel, review any relevant airport websites and travel updates before your trip.
 
On the plane
To use your Dexcom G7 app or receiver to get sensor glucose information while on the plane, follow these instructions:
  • App: Switch smartphone to airplane mode. Keep the app running.
  • Receiver: Keep receiver on
 
Contact your airline for their policies. Always follow instructions from the airplane crew while on the plane.
 
*Compatible smart devices sold separately. To view a list of compatible smart devices, visit dexcom.com/compatibility
The first time you start the Dexcom G7 app, it verifies that the country you are in matches the country of residence in your account. This ensures you will get the resources and features approved for use where you are currently located.
 
After you install the app, it will remember your information and not ask to check again. So you can travel to other countries, start new sensors, and update the app while traveling.
 
If you’ve moved to a different country since creating your account and saving your country of residence, you must create a new account. For example, if you set up a Dexcom account while living in United States, and have since moved to the United Kingdom, you must create a new account with the UK as your country of residence.
 
If you have trouble with the location check, please contact your local technical support.
 
*Compatible smart devices sold separately. To view a list of compatible smart devices, visit dexcom.com/compatibility
The Dexcom G7 sensor is waterproof up to 8 feet (2.4 meters).* You can also get the sensor wet while bathing, showering, or swimming. The Dexcom G7 receiver is not waterproof but is splash resistant.
 
If you’re in or near water, your compatible display device† may need to be closer than 20 feet (6 meters) to get sensor readings.
If you’re in water, you may not get sensor readings until you get out. The patch stays on longer if kept dry.
 
*The Dexcom G7 sensor is waterproof and may be submerged under eight feet of water for up to 24 hours without failure when properly installed.
Compatible smart devices sold separately. To view a list of compatible smart devices, visit dexcom.com/compatibility

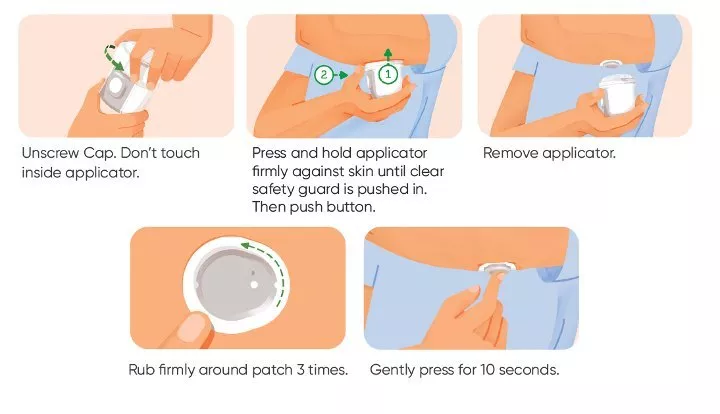
How to insert your Dexcom G7 sensor

See Our Dexcom G7 Videos

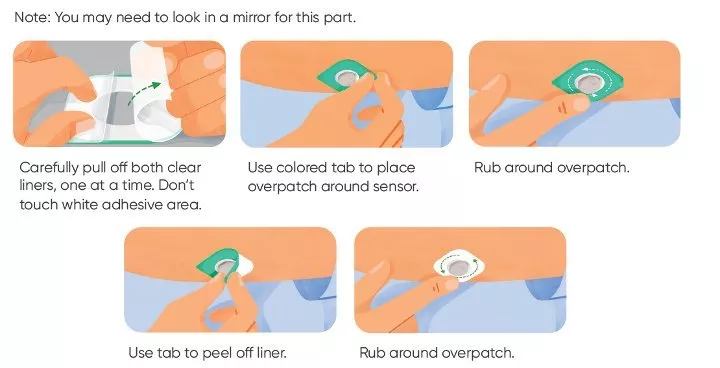
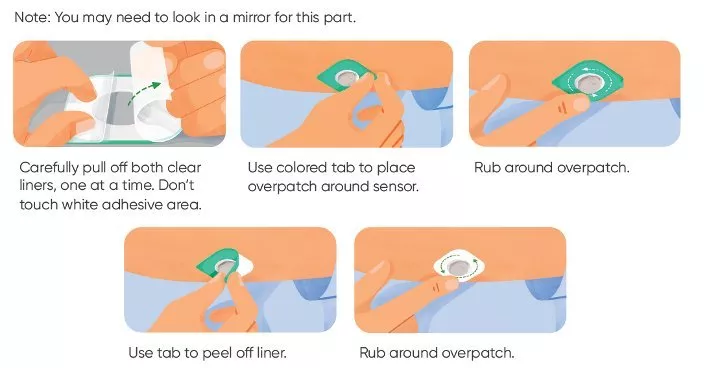
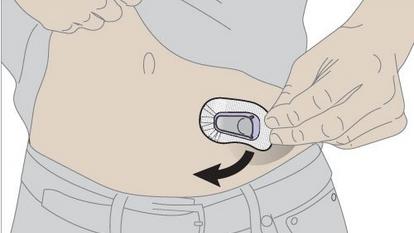
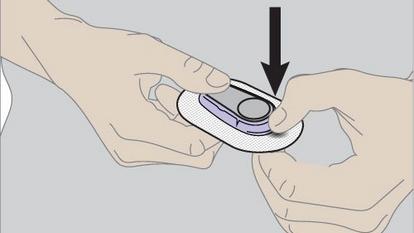
How to apply your overpatch

See Our Dexcom G7 Videos

g7 securing your sensor medical by baby's on broadway at baby’s on broadway, we understand the importance of reliable and durable medical equipment in your healthcare journey; whether it’s for you or someone you care about.

If you were prescribed G7 and you need to switch back to Dexcom G6, reach out to your doctor and obtain a new prescription for Dexcom G6. Healthcare Providers should continue to prescribe G6 for patients seeking (or using) automated insulin delivery systems until G7 is compatible with their preferred AID system of choice.

*Compatible smart devices sold separately. To view a list of compatible smart devices, visit dexcom.com/compatibility


Your smartphone settings can prevent the Dexcom G7 app from working optimally. Your smartphone settings may prevent notifications or may override alert volumes or functions. Learn more about the settings we recommend and how to check them.
The location of each setting may be different based on your Android OS version. Please refer to your smart device’s instructions for detailed information.* Not sure which Android OS version you’re on? Find your device’s OS version within the About section of your smartphone’s Settings.
 

Focus Mode

Focus Mode disables apps when it is on. Using Focus Mode with the Dexcom G7 app may prevent you from getting sensor readings and alerts.
 
How to turn Focus Mode off
  • Go to your Android smartphone’s Settings
  • Find Digital Wellbeing
  • Turn off Focus Mode, or confirm that the Dexcom G7 app is not on the Distracting Apps list


App Pause

 
The App Pause setting temporarily disables apps. Using App Pause with the Dexcom G7 app stops all alerts and sensor readings.
 
How to exit App Pause
  • Long press the Dexcom G7 app icon on the desktop or in the app drawer
  • Tap the pause button to edit App Pause


Battery Saver Mode

 
Battery Saver Mode disables the background data. When it is on, your alerts may be delayed. If you’re using the Share feature of your Dexcom G7 app, information sent to designated followers using the Dexcom Follow app†,‡ may also be delayed.
 
How to turn Battery Saver Mode off
  1. Go to your Android smartphone’s Settings
  2. Tap Battery and Device care
  3. Tap Battery
  4. Turn off Battery Saver Mode, or choose the highest battery performance available


Adaptive Battery


The adaptive battery setting can sometimes prevent the Dexcom G7 app from running in the background when you don’t have the app open and displayed. If the Dexcom G7 app is not running in the background, you won’t get alerts.
 
How to turn Adaptive Battery off
  1. Go to your Android smartphone’s settings
  2. Tap Battery and Device care
  3. Tap Battery
  4. Tap More battery settings
  5. Turn Adaptive Battery off


Battery Optimizing

 
Battery Optimizing prevents the Dexcom G7 app from running in the background when you don’t have the app open and displayed on your smartphone screen. When it is on for the app, your alerts may be delayed. If you’re using the Share feature of your Dexcom G7 app, information sent to designated followers using the Dexcom Follow app†,‡ may also be delayed. Turn off Battery Optimizing for the app.
 
How to turn Battery Optimizing off
  1. Go to your Android smartphone’s Settings
  2. Tap Apps
  3. Tap the 3 vertical dots on the top right side of the screen
  4. Choose Special Access
  5. Tap Battery Optimalization
  6. Tap the filter and select All
  7. Find the Dexcom G7 app
  8. Turn It off for the Dexcom G7 app


Optimized Battery Charging

 
The optimized battery charging setting can cause apps to shut down during the time that the phone Is charging. When the Dexcom G7 app Is shut down, you will not get any notifications or alerts.
 
How to turn Optimized Battery Charging off
  1. Go to your Android smartphone’s settings
  2. Tap Battery
  3. Tap Battery Health
  4. Turn Optimized Battery Charging off


Device Bluetooth

 
The Dexcom G7 app uses Bluetooth to connect with your sensor. You must keep your device’s Bluetooth turned on to get sensor readings and alerts. It is also good practice to delete old Dexcom G7 sensors from your device’s Bluetooth list.
Note: Dexcom G7 sensors connect, send data, and disconnect every 5 minutes. The pairing in Bluetooth for your current Dexcom G7 sensor will likely say “not connected” and is expected.
 
How to turn Bluetooth on
Go to your Android smartphone’s Settings, find Bluetooth, and turn it on.
 
How to remove an old sensor from your smartphone’s Bluetooth connections
 
Before inserting a new sensor, remove old sensors from your phone’s list of Bluetooth connections. There may be more than one sensor listed because your phone saves each sensor as a new device in the Bluetooth connections list.
  1. Go to your Android smartphone settings > Bluetooth
  2. Find your used sensor in the list of paired devices
    • Tip: All Dexcom G7 sensor names start with DXCM
  3. Tap Settings to see details about the connection
  4. Tap Unpair


Location

 
Location must be turned on to use Bluetooth. Android requires you to give the Dexcom G7 app location permission all the time to use Bluetooth. If you don’t, you won’t get alerts or sensor readings. Dexcom does not use this permission to track your location.
 
How to turn Location Permission on
  1. Go to your Android smartphone’s settings
  2. Confirm device Location is on
  3. Find Dexcom G7 in Apps
  4. Tap Location Permission
  5. Tap Allow All the Time


Nearby Device Permission

 
On Android 12 and above, you must allow Nearby Device Permission for the Dexcom G7 app to work. This permission is needed for the app to access your smartphone’s Bluetooth.
 
How to turn Nearby Device Permission on
  1. Go to your Android smartphone’s settings
  2. Find Dexcom G7 in Apps
  3. Tap Notification
  4. Turn on Notification


Notifications Permission

 
Notifications allow you to receive alerts on your smartphone. If notifications for the Dexcom G7 app are off, you won’t get alerts.
 
How to turn Notifications on
  1. Go to Android smartphone’s settings
  2. Choose Dexcom G7
  3. Turn Notifications on.


Background Restrictions

 
Background Restrictions prevent the Dexcom G7 app from running in the background when you don’t have the app open and displayed on your smartphone screen. When it is on for the app, you won’t get alerts and sensor readings while the app is running in the background. Turn off Background Restrictions for the app.
 
How to turn Background Restrictions off
  1. Go to your Android smartphone’s settings
  2. Tap on Battery and Device care
  3. Tap on Background usage limits
  4. Turn “unused apps to sleep” off


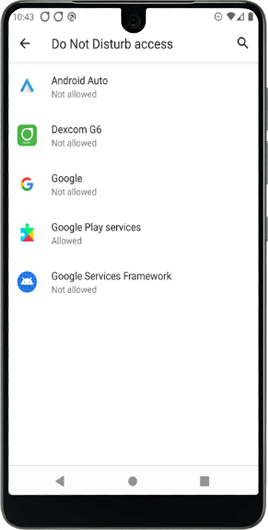
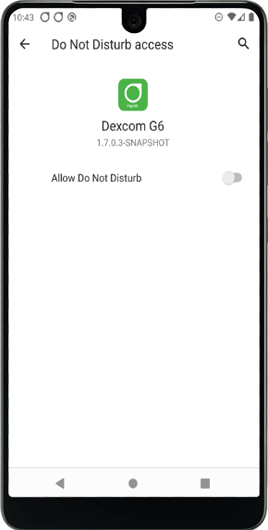
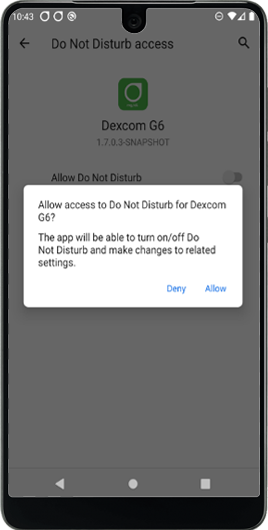
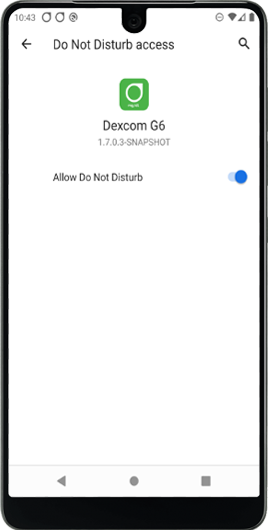
Do Not Disturb (DND) Permission

 
The Do Not Disturb Permission ensures you get important Dexcom G7 alerts, like the Urgent Low Soon alert, even when you put your smartphone in the most restrictive Do Not Disturb mode. You must allow the Do Not Disturb Permission for the app to work.
 
How to turn the DND Permission on
Follow the in-app instructions or
  1. Go to your Android smartphone’s Settings
  2. Find DND Permission or DND Access,
  3. Choose the Dexcom G7,
  4. Tap Allow DND
  5. Tap Allow
 
*Compatible smart devices sold separately. To view a list of compatible smart devices, visit dexcom.com/compatibility †Separate Dexcom Follow app required. Internet connectivity required for data sharing. Followers should always confirm readings on the Dexcom G7 app or receiver before making treatment decisions.‡Followers must have compatible smart devices to use the Dexcom Follow app: dexcom.com/compatibility
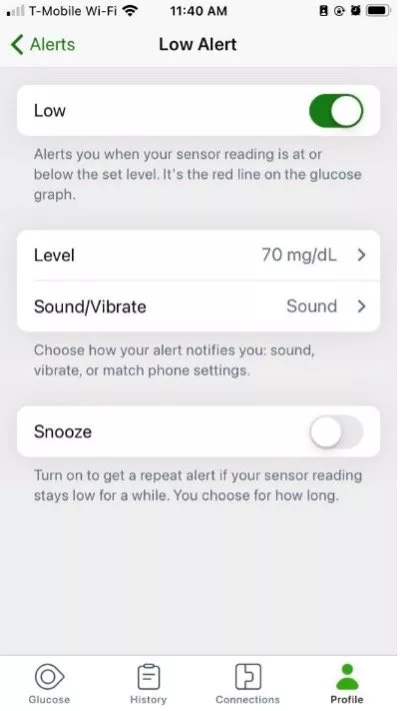
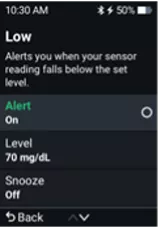
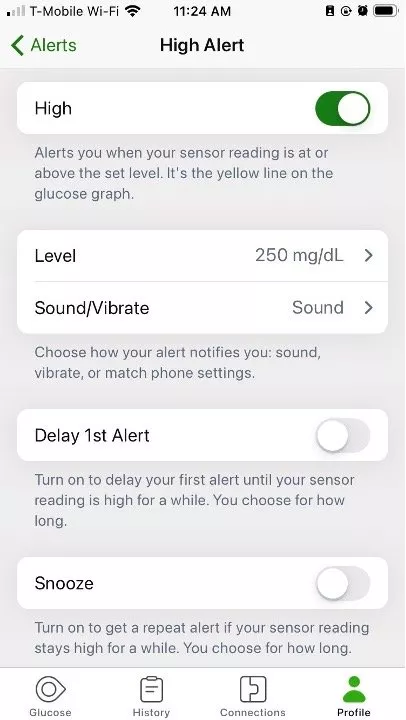
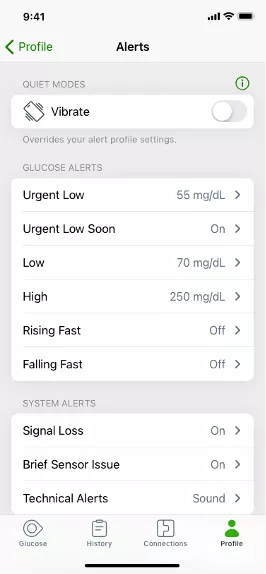
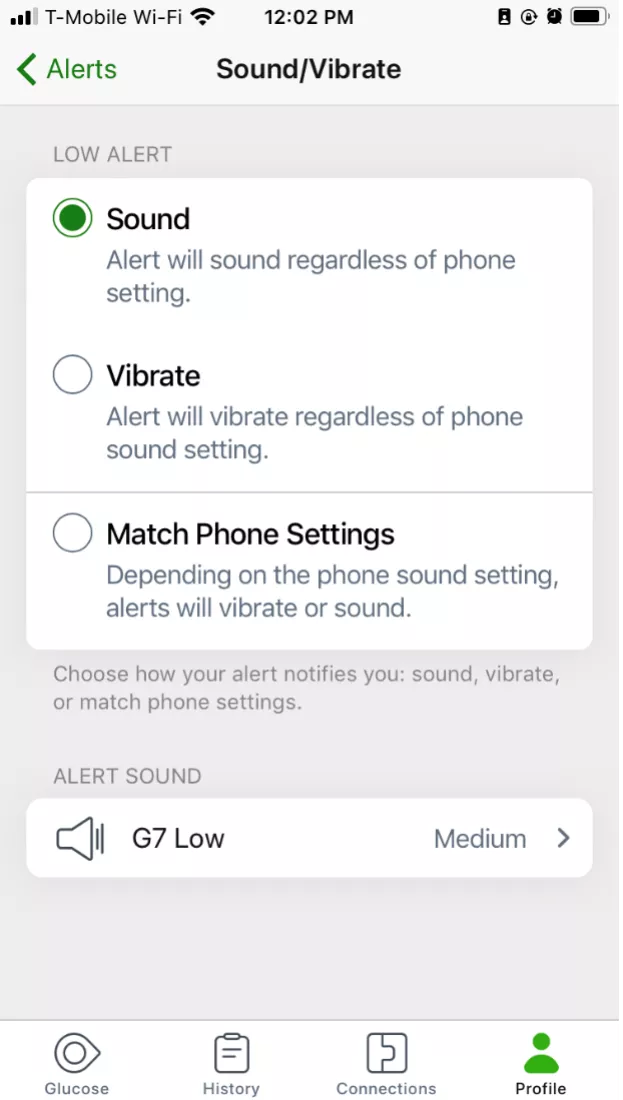
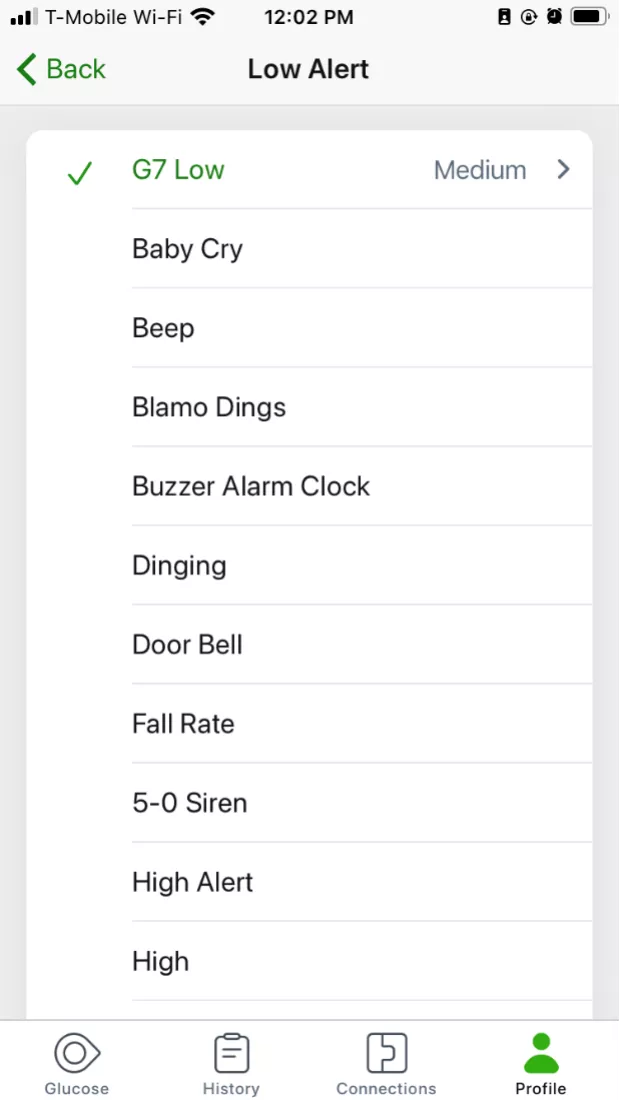
Go to Profile > Alerts to customize each alert. The Low Alert screen below shows some settings you can change:
 
App: Level, Sound/Vibrate, and Snooze
 
Receiver: Level and Snooze
 
mgdl g7 low alert medical by baby's on broadway at baby’s on broadway, we understand the importance of reliable and durable medical equipment in your healthcare journey; whether it’s for you or someone you care about.
 
g7 low alert on medical by baby's on broadway at baby’s on broadway, we understand the importance of reliable and durable medical equipment in your healthcare journey; whether it’s for you or someone you care about.
 
When adjusting the Level setting, think about what sensor reading makes you respond. Set your alert level at that number.
 
For example, if you don’t respond until your sensor reading is 65 mg/dL but your Low Alert is at 80 mg/dL, you’re getting alerts you don’t use. Set your Low Alert level to 65 mg/dL so you only get it when it matters to you.
 
*Compatible smart devices sold separately. To view a list of compatible smart devices, dexcom.com/compatibility
 
Your smartphone settings can prevent the Dexcom G7 app from working optimally. Your smartphone settings may prevent notifications or may override alert volumes or functions. Learn more about the settings we recommend and how to check them.
 
The location of each setting may be different based on your iOS version. Please refer to your smart device instructions for detailed information.* Not sure which iOS version you’re on? Find your device’s iOS version within the About section of your smartphone’s Settings.
 

Screen Time

The Screen Time features Downtime and App Limits options can temporarily disable apps. If you set time limits for the Dexcom G7 app, you may not open the app or get alerts or sensor readings outside of those specified time limits.
 
How to add Dexcom G7 to Allowed Apps
  1. Go to your iPhone’s Settings
  2. Tap Screen Time
  3. Turn off Downtime and App Limits, or add the Dexcom G7 app to the Always Allowed app list


Do Not Disturb

 
Do Not Disturb silences all alerts except for the Urgent Low Soon and important technical alerts. If any of your Dexcom G7 alerts are set to Sound, they should override your smartphone settings so that you can hear these alerts.
 
How to turn Do Not Disturb off
  1. Go to your iPhone’s Settings
  2. Tap on Do Not Disturb
  3. Turn it off
 
To allow Dexcom G7 alerts to sound during Do Not Disturb:
  1. Open your Dexcom G7 app
  2. Tap Profile
  3. Tap Alerts
  4. Choose “Sound” within each alert.
 

Low Power Mode

 
Low Power Mode may prevent the Dexcom G7 app from running in the background when you don’t have the app open and displayed on your smartphone screen. When Low Power Mode is on, alerts may be delayed. If you’re using the Share feature of the Dexcom G7 app, information sent to designated followers using the Dexcom Follow app†, may also be delayed.
 
How to turn Low Power Mode off
  1. Go to your iPhone’s Settings
  2. Tap Battery
  3. Turn off Low Power Mode


Optimized Battery Charging

 
The optimized battery charging setting can cause apps to shut down during the time that the phone Is charging. When the Dexcom G7 app Is shut down, you will not get any notifications or alerts.
 
How to turn Optimized Battery Charging off
  1. Go to your iPhone smartphone’s settings
  2. Tap on Battery
  3. Tap on Battery Health
  4. Turn Optimized Battery Charging off


Device Bluetooth

 
Your Dexcom G7 app uses Bluetooth to connect with your transmitter. You must keep your smartphone’s Bluetooth turned on to get alerts and sensor readings. It is also good practice to delete old Dexcom G7 sensors and/or Dexcom G6 transmitters from your device’s Bluetooth list. (Note) Dexcom G7 sensors connect, send data, and disconnect every 5 minutes. The pairing in Bluetooth for your current Dexcom G7 sensor will likely say “not connected” and is expected.
 
How to turn Bluetooth on
  1. Go to iPhone Settings
  2. Find Bluetooth
  3. Turn it on
 
How to remove old sensors from Bluetooth connections
 
Before inserting a new sensor, remove old sensors from your phone’s list of Bluetooth connections. There may be more than one sensor listed because your phone saves each sensor as a new device in the Bluetooth connections list.
  1. Go to iPhone’s Settings > Bluetooth
  2. Find your used sensor in the list of devices
    Tips:a. Bluetooth shows all sensors as Not Connected
    b. All Dexcom G7 Dexcom sensor names start with DXCM
  3. Tap i to see details about the connection
  4. Tap Forget This Device
 
Apple requires you to give the Dexcom G7 app permission to use Bluetooth. You must keep the Bluetooth Permission turned on for the Dexcom G7 app to work.
 
How to turn Bluetooth Permission on
  1. Go to Settings
  2. Tap on Dexcom G7
  3. Turn Bluetooth on


Notifications Permission

 
Notifications let you get alerts on your smartphone. If notifications for the Dexcom G7 app are off, you won’t get any alerts. Allow notifications for the Dexcom G7 app to work. On iOS 15 and above, do not add the Dexcom G7 app to Scheduled Summary.
 
How to turn Notifications on
  1. Go to your iPhone’s Settings
  2. Tap Dexcom G7
  3. Tap Notifications
  4. Turn on Notifications


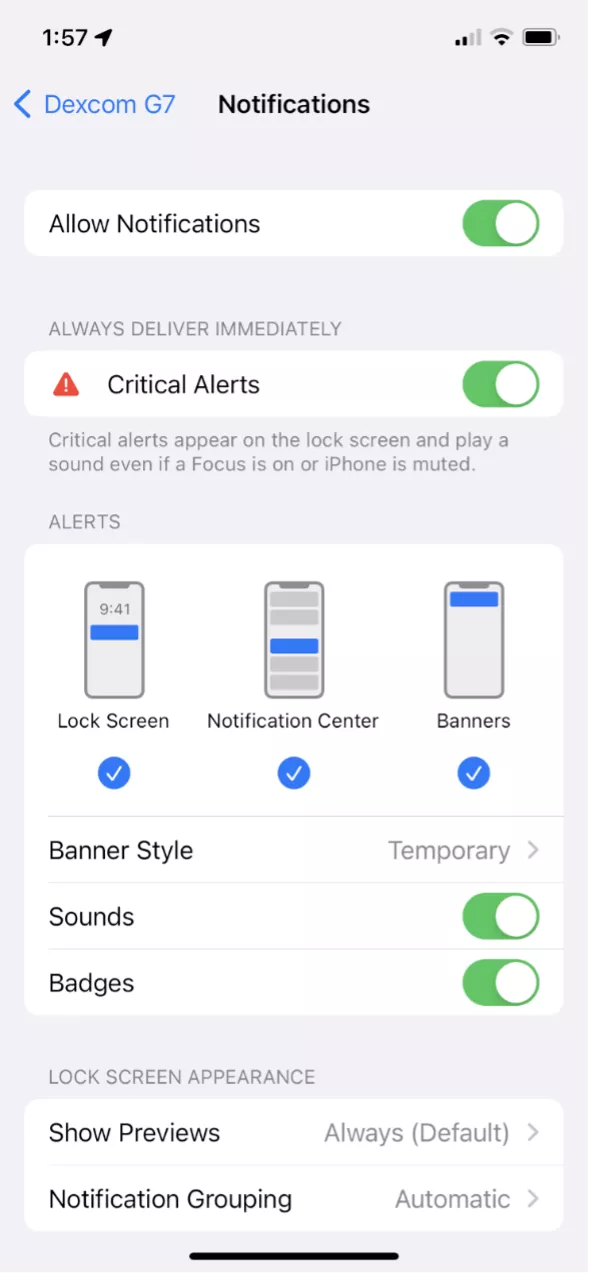
Critical Alerts

 
Critical Alerts should always play a sound and appear on your lock screen when your smartphone notifications are off, muted, or on Do Not Disturb. Critical Alerts include Urgent Low Soon and Sensor Failure.
 
How to turn Critical Alerts on
  1. Go to your iPhone’s Settings
  2. Tap Dexcom G7
  3. Tap Notifications
  4. Turn on Allow Critical Alerts
 
*Compatible smart devices sold separately. To view a list of compatible smart devices, visit dexcom.com/compatibility
†Separate Dexcom Follow app required. Internet connectivity required for data sharing. Followers should always confirm readings on the Dexcom G7 app or receiver before making treatment decisions.

‡Followers must have compatible smart devices to use the Dexcom Follow app: 
https://www.dexcom.com/compatibility
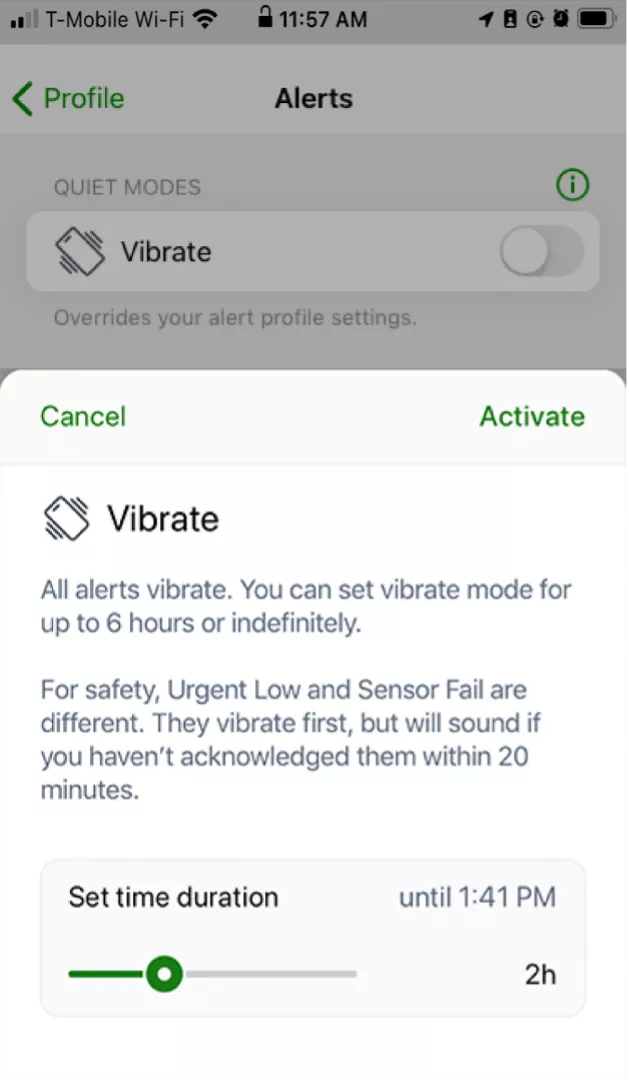
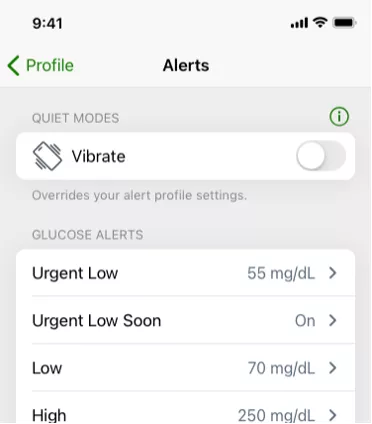
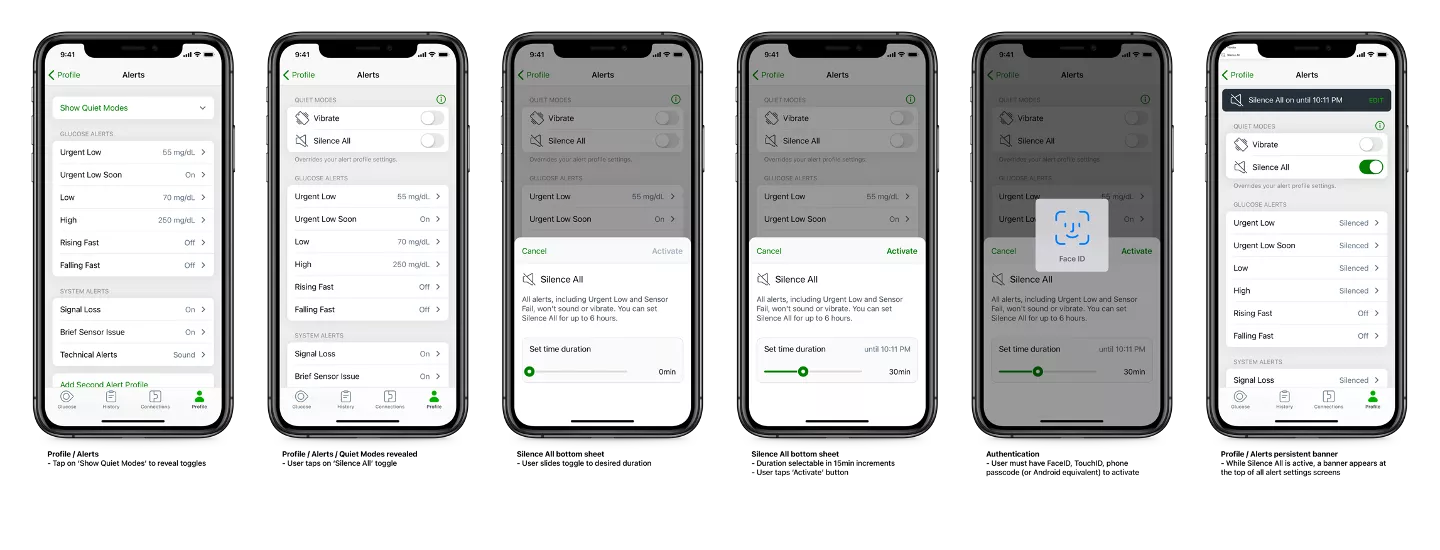
Quiet Modes allow you to quickly change your alerts to be more discreet by overriding each alert’s Sound/Vibrate setting.
 
You still see alerts on your phone’s lock screen and in the app. A banner with the stop time shows at the top of your screen when you use Quiet Modes.
The new Dexcom G7 CGM System requires sensors, sensor overpatch, and a compatible display device. If you use a compatible smart device,* you will need to download the new Dexcom G7 app. An optional receiver is available as well.
 
*Compatible smart devices sold separately. To view a list of compatible devices, visit dexcom.com/compatibility
 
To install the Dexcom G7 Apple Widget, you must first update your Dexcom G7 App to version 1.7.0 or later via the App Store. To install the Dexcom G7 Apple Widget, you must first update your Dexcom G7 App to version 1.7.0 or later via the App Store.
 
To add the Dexcom G7 widget to your home screen, follow these steps:
  1. From the Home Screen, touch and hold a widget or an empty area until the apps jiggle.
  2. Tap the Add button in the upper-left corner.
  3. Select the Dexcom widget, then tap Add Widget.
  4. Done.
 
*Compatible smart devices sold separately. To view a list of compatible smart devices, visit dexcom.com/compatibility
 
To add the Dexcom G7 widget to your Today View screen, follow these steps:
  1. . Swipe right from the Home Screen or Lock Screen.
  2. Touch and hold a widget or an empty area in Today View until the apps jiggle.
  3. Tap the Add button in the upper-left corner.
  4. Select the Dexcom G7 widget, then choose from three widget sizes.
  5. Tap Add Widget, then tap Done.
 
For step-by-step visuals on how to add a widget to your iPhone’s lock screen or home screen visit the Apple instruction page for widgets HERE.
 
How does the Dexcom G7 Apple Widget work?
 
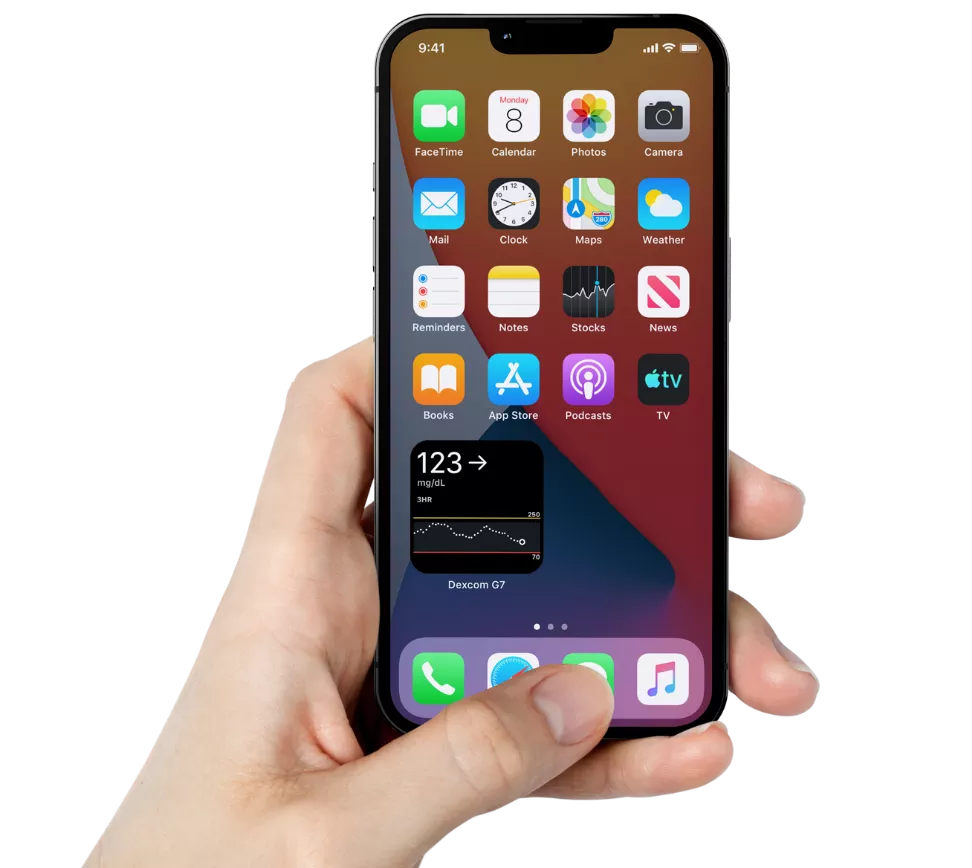
The Dexcom G7 Apple widget lets you see your glucose numbers on your lock screen or home screen without opening the app.
 
For the widget to work, your G7 app must still be running in the background when you don’t have the app displayed.
 
en us g7 faq apple widget medical by baby's on broadway at baby’s on broadway, we understand the importance of reliable and durable medical equipment in your healthcare journey; whether it’s for you or someone you care about.
 
*Compatible smart devices sold separately. To view a list of compatible smart devices, visit dexcom.com/compatibility
 
Why is the Dexcom G7 Apple Widget displaying “—” and not my glucose number?
 
The widget changes for different situations, such as these:
 
“ —”: Displays where there’s no sensor reading available. The operating system limits the number of times a widget can be updated each day. When the widget hasn’t updated as expected, it will show ”—” instead of a sensor reading and there will be a gap in the trend graph.
 
No Alerts banner and “—”: Displays when there’s an alert that prevents you from seeing a sensor reading, such as Signal Loss. There will be a gap in the trend graph.
 
To open the G7 app, just tap the widget. This will direct you right to the Dexcom G7 App to get your glucose reading when the widget is showing “—“.

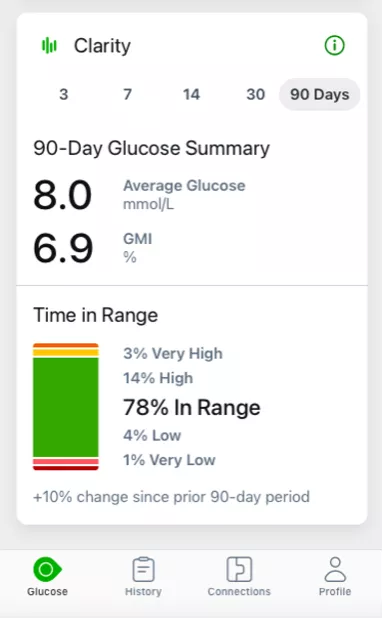
Yes, Dexcom G7 works with Dexcom Clarity. Users who used Dexcom Clarity with Dexcom G6 do not need to register again. The G7 app also conveniently integrates a Clarity data summary (called the Clarity card) into the home screen of the G7 app for quick and easy insights. Learn more about Dexcom Clarity here.

When you get an alert, your first priority is to resolve it by making a treatment decision or fixing a system issue.
 
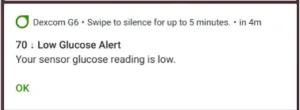
Afterwards, acknowledge the alert on your display device by tapping OK. Until you acknowledge the alert, it will sound every 5 minutes. You can also acknowledge an alert from your Lock screen by following these instructions:

iPhone

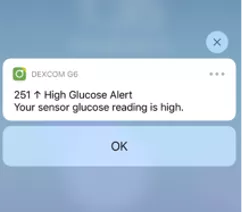
Option 1: From the Lock screen, touch and hold the notification until OK appears. Tap OK to acknowledge the alert.
g7 high glucose alert medical by baby's on broadway at baby’s on broadway, we understand the importance of reliable and durable medical equipment in your healthcare journey; whether it’s for you or someone you care about.
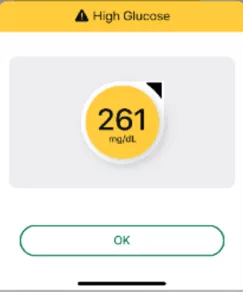
Option 2: Tap the Lock screen notification to open the app. From the app, tap OK on the alert to acknowledge it.
mgdl g7 high glucose alert medical by baby's on broadway at baby’s on broadway, we understand the importance of reliable and durable medical equipment in your healthcare journey; whether it’s for you or someone you care about.

Android

Option 1: If your notification has an OK button, tap OK to acknowledge the alert.
Option 2: If your notification doesn’t have an OK button, pull down on the notification and tap OK to acknowledge the alert.
Option 3: Tap the notification (not the OK button) to open the app. Then tap OK to acknowledge the alert.
g7 low glucose alert medical by baby's on broadway at baby’s on broadway, we understand the importance of reliable and durable medical equipment in your healthcare journey; whether it’s for you or someone you care about.